Whether your compost pile is placed in an open area or in an enclosed bin (in-vessel), the basic process remains the same: Combine organic materials that make a carbon to nitrogen ratio of 30:1, periodically mix, and add water when needed.
While in-vessel containers are great for keeping out critters and protecting against heavy rainfall, many get frustrated as they feel like no matter how often they mix their pile, they will still be left with a soggy mess that refuses to dry.
So what’s going on here?
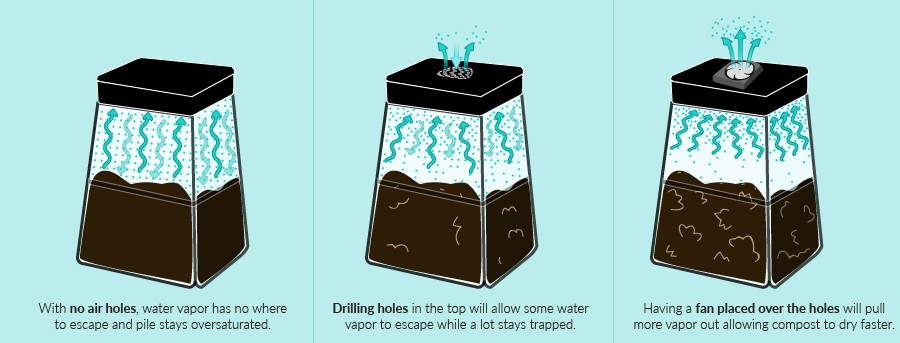
Typical in-vessel compost bins will usually have some sort of opening towards the bottom (or no bottom at all) for excess water to drain out and then some perforated holes towards the top for ventilation. While the water in the lower half of your pile will maintain its liquid state as it seeps out, the water in the upper half will evaporate, forming vapors that will rise up and escape out of the perforations, thus helping lower the overall wetness of the pile. Unfortunately, the holes at the top can be quite restrictive and much of the water vapor in the air will stay trapped inside, preventing your pile from reaching a dryer state.
A way to help alleviate the situation is to add a solar powered fan to an opening of your compost container; The fan will help force the water vapor out therefore lessening the amount of moisture and allowing the microbes in your compost to breathe and go to work. Bonus: The solar panel means no nearby outlet is needed!
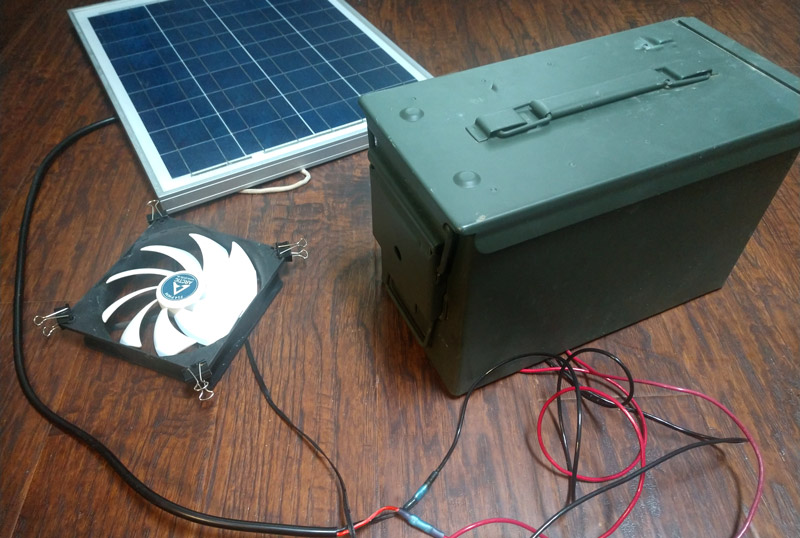
We’re going to show you how you can connect your own solar powered fan to your composter for under $100!
-
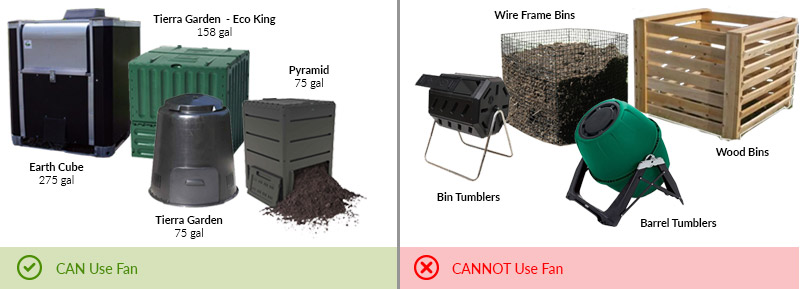
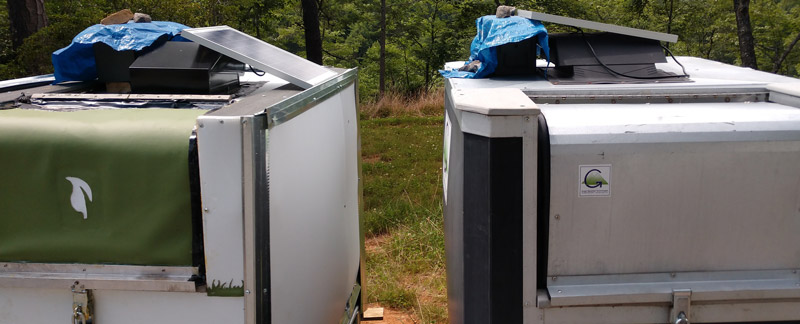
Our instructions show how to attach the setup to a 275 gallon Earth Cube, but you should be able to adapt it to a variety of bins as long as they are mostly enclosed. The fan will not be able to direct airflow if the container’s tops or sides are mostly exposed (and rotating tumblers will not be compatible with this setup).
- You don’t need much of an electrical background, but just the basic knowledge of how to strip, crimp and connect wires. With all electronics, please take proper precautions and be careful.
- Keep in mind this is not a blower and we’re not forcing a bunch of air into your pile but rather helping remove excess moisture from the top.
How to Connect a Solar Fan to Your Composter
- 20A/12V Solar Controller
- 20W/12V/1.16A Solar Panel
- 12V Lead Acid Battery
- 12V 140 mm F14/PWM Fan
- Weatherproof .50 Cal Metal Ammo Case (11-1/8 in. x 5-1/2 in. x 6-7/8 in)
- Polystyrene Foam Board (0.75” thick)
- Plastic Slant-Back Roof Louver (with static vent)
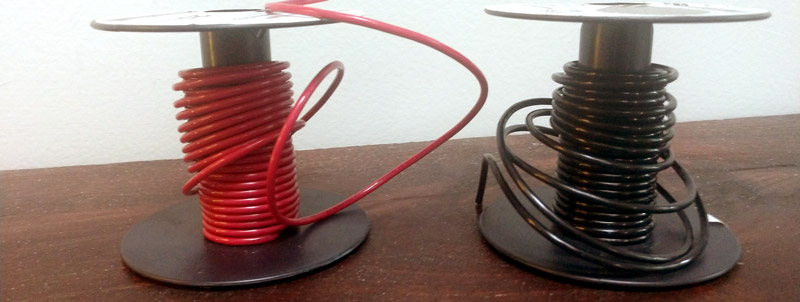
- 50ft/14g Stranded Red Copper THHN Wire
- 50ft/14g Stranded Black Copper THHN Wire
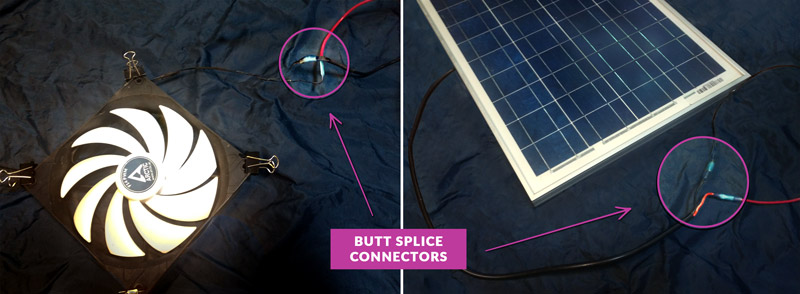
- 14 g waterproof heat shrink Butt Splice Connectors (only need 4)
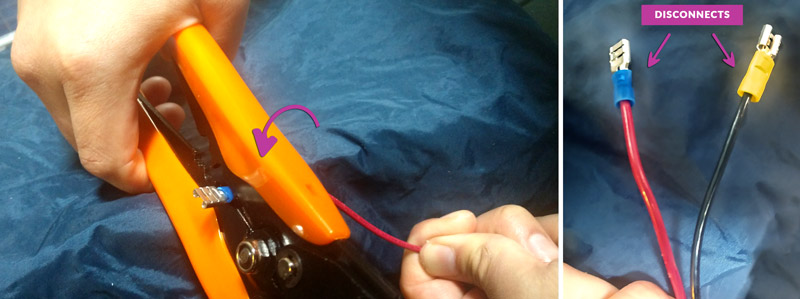
- 14g Spade Connectors (only need 2 female)
- Wire Crimper
- Wire stripper
- Scissors or Blade
- Binder Clips (x4)
- Liquid Electrical Tape
- Outdoor caulk
- #8 x ¾” Latch Screws (x8)
- 4” x 4” x 2” Cedar or Treated Wood Pieces (x2)
The entire process revolves around the solar charge controller – a device that bridges an electrical current between your solar panel, battery, and fan while also regulating the voltage to prevent overcharging.
Below is a diagram that shows the basic setup and how we will wire everything together to get your solar powered fan up and running:

Step 1: Prepping Your Composter
First, we are going to drill holes into the top of your composter. Draw a circle on the center of your lid that is 6” in diameter. Within that circle, you’ll want to drill ½” holes (spaced about ¼” vertically and ½” horizontally).
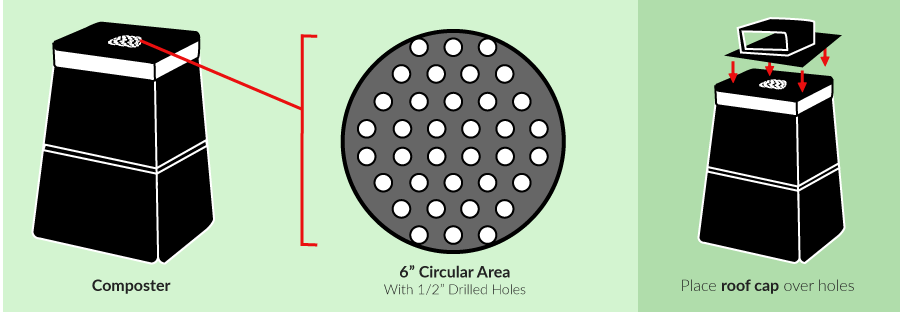
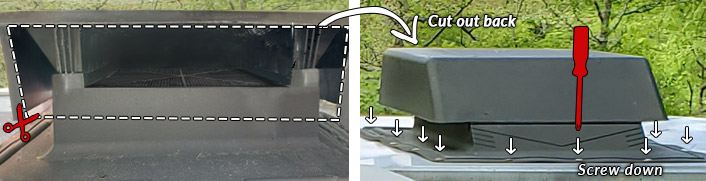
Take your roof louver and lay it directly over the holes you drilled, leaving nothing uncovered. You’ll notice eight holes bordering the louver – drill a latch screw into each one to secure it in place.
Grab a scissor or blade and carefully cut out the back of the louver, exposing the inner vent (this is where your fan will later be placed).
Step 2: Cutting & Stripping the Wires
A pair of red and black wires will need to be cut for each of the three devices (panel, battery, and fan). The lengths will depend on where you are going to place your ammo box (the heavy duty ammo case was chosen to house the battery and controller as it has a waterproof seal). See if you can fit the ammo box on top of the composter next to the louver. If there is not enough room, you’ll want to have some sort of stand alongside that raises the ammo box to the height of your composter.
Measure the distance between the center of the louver and where the ammo box will be, add another foot, then cut TWO pairs of red and black wires to that length. Each pair of wires will be for extending the wires of the fan and solar panel.
Cut another pair of red and black wire to 1 ½ ft length. This pair will be for connecting the battery.
You should end up with 6 wires total (3 red, 3 black).
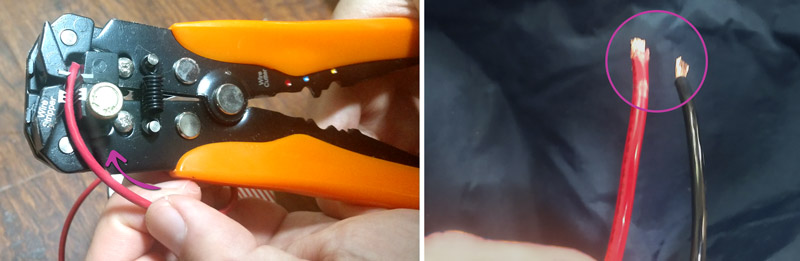
Use your wire stripper to strip each end of the 6 wires , then also strip the ends of both wires for the fan and solar panel.
Step 3: Connecting the Wires
Now we are going to extend the wires for both the fan and solar panel via butt splice connectors.
Take the positive wire of the fan and push it in one opening of the splice connector, then take the red wire you cut for the fan and push into the other open end of the connector. The two wires should meet in the middle and come into contact with a central metal piece that’s inside. Crimp each half of the connector to hold the wires in place, then take a heat gun to ‘shrink’ the down ends to compress it tightly around the wires.
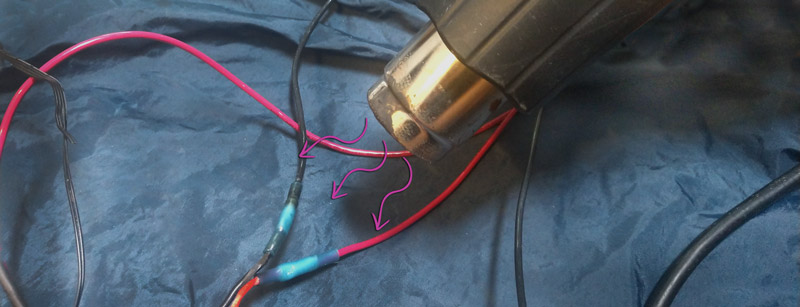
You’ll want to do the same for connecting the negative wire of the fan and the black wire that you cut using another butt splice connector.
Step 4: Running Wires Through The Ammo Box
If you are like most people and have winters that can go below 32°F, you should probably insulate the ammo case before going any further. Lead acid batteries contain gels that can potentially freeze when the battery is not fully charged. Insulation foam is a cheap and easy way to protect your battery and keep it above freezing temperatures.
You’ll need to cut 6 pieces of insulating foam:
A: (x2) 5 ¾ x 7” (used for front and back)
B: (x2) 9.5 x 7” (used for the sides)
C: (x2) 4 ¼ x 9.5” (used for the top and bottom)
The A pieces go in first at the front and back end of the ammo case. Use one B piece to line the bottom. The C pieces will align the sides. (Save the last B piece as it will go on top once you are ready.)
The foam pieces should feel tight and snug when being pushed in.
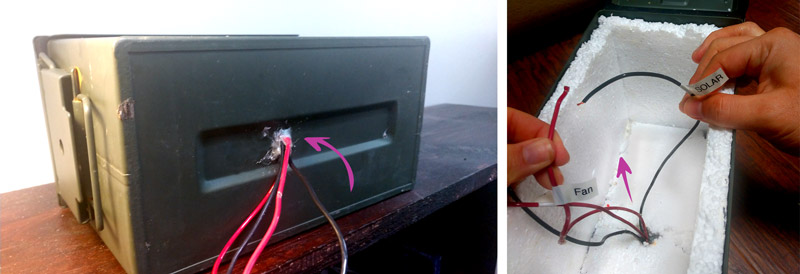
Turn the ammo box on its side. Drill a small hole into the bottom at the approximate center point (through both the case and foam). The hole should be just big enough to pull the ends of the four newly extended wires through the opening and into the case by about a foot. Use a label maker or write on some masking tape to help you keep track of which wires come from what.
In order to keep the wires in place, caulk the hole from both the inside and outside of the case. Let it sit to dry.
Step 5: Add Spade Connectors (a.k.a. disconnects)
While the caulk is drying, let’s work on the wires for the battery. Take the 1 ½ ft wires that you cut and crimp a spade connector onto one end of each. These will be used to connect to the metal terminals of your battery (just not yet!)
Now it’s time to connect all the wires to the solar controller!
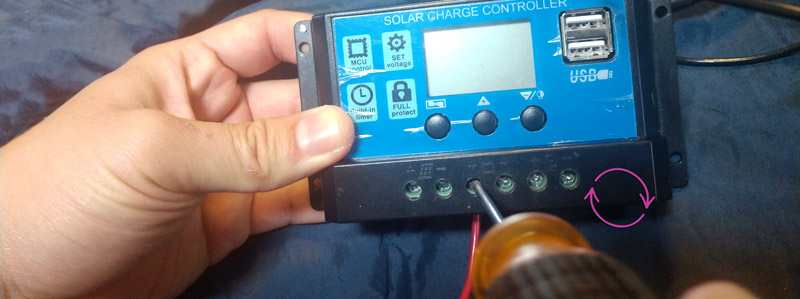
Step 6: Connecting to the Controller
The controller makes it easy to see what wires should go where. The icons shown from left to right: Solar Panel, Battery, Light Bulb (which in our case will be a fan). There is also a plus and minus sign on the sides of each icon representing where each device’s positive and negative wires should go.
To secure each wire in place, shove the stripped end into the hole below its corresponding icon and polarity symbol – make sure the screws are loosened so you can push the wires in as far as they can go.

Once a wire is in, use a small screwdriver to tighten the screw directly above it -this will cause a small piece of metal to press down, clenching the wire in place. It is very important to keep turning the screw as much as possible because if that metal doesn’t go down all the way, the wire will likely slip out.
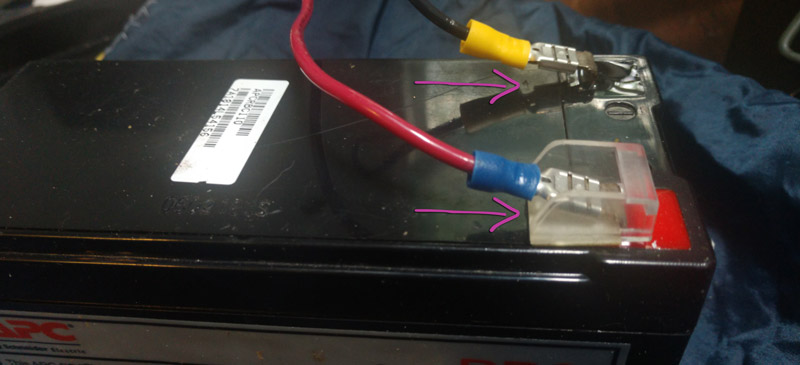
Attach the red wire’s connector onto the terminal marked with a red square (the positive connection) while the black wire’s connector should be attached to the other.
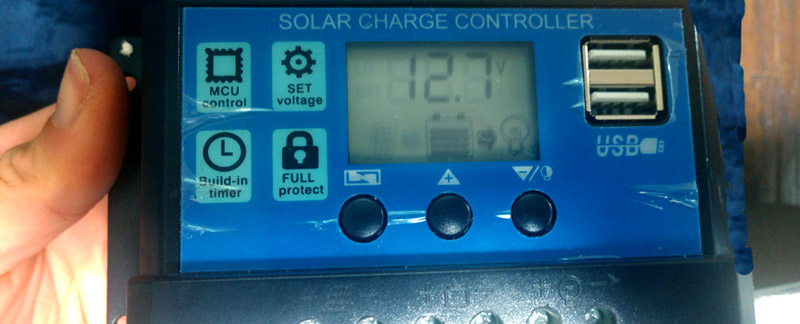
Step 7: Test it Out
The fan may not turn on right away if your battery is completely dead. To ensure everything is connected properly, place your setup in a sunny area so the solar panel can draw in power. Whatever is connected will have its icon light up on the screen. You should also see a number on the controller’s screen that shows the amount of voltage that the solar panel is giving to the battery (up to 14.5v).
Step 8: Bring Setup To Composter
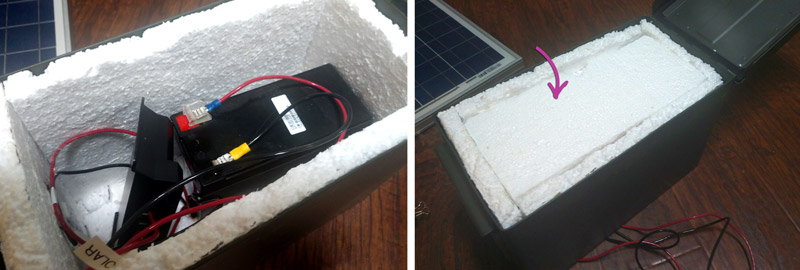
Once you are satisfied that your system is working properly, place the battery and controller next to each other inside of the ammo case, then place the last piece of the insulation on top and close the lid shut.

Important! When you place the ammo box on top of the composter/stand, you’ll want to prop up the box a couple of inches from the surface to avoid rainwater from pooling around the bottom hole. Place your two wood pieces underneath to prop it up 2”.
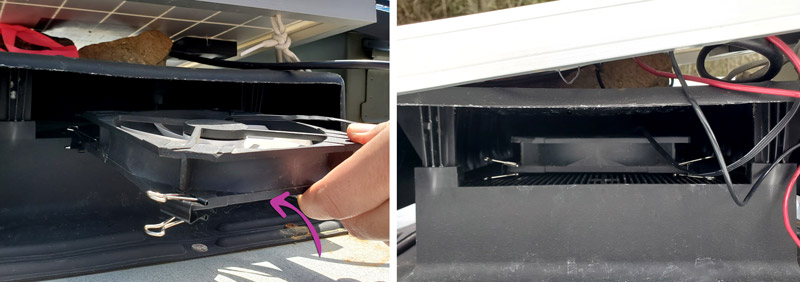
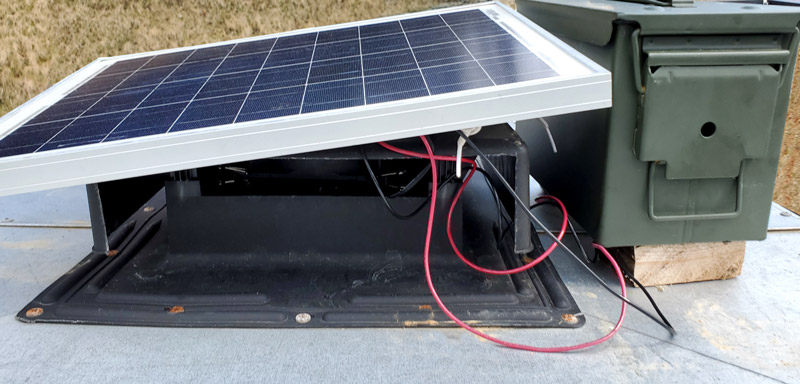
Place the fan inside the roof cap (logo side down) on top of the grate; Make sure the air is blowing upward.
Place the solar panel on top of the roof cap and then tilt it in the direction that gets the most sunlight (you may want to tuck some small rocks underneath to help balance it). Hide as much of the loose wires below the panel, especially the parts with the butt splices. To avoid your solar panel from blowing out of place, tie string through the holes of the panel and then tie to rocks to weigh it down.
You’re Done!
During the warmer parts of the year your fan should keep running for the most of the day. To ration the energy during the winter months, you can set a timer on the controller for how many hours to run the fan on a daily basis.
Hopefully in a few days, you’ll notice a less damp (and less smelly) compost.
Have fun!