Update: This tutorial follows the original design of our reusable bags. Visit our store to check out our new and improved (still handmade) products.
Unless your town allows you to flush dog waste down the toilet or offers a composting program specifically for doggie caca, your dog’s doo will inevitably go to a landfill no matter what method of picking up you use. But think about all those tiny plastic bags that won’t be sent to the dump! By using a reusable dog waste bag, you will be forced to deposit your collected doggie doo into one large consolidated bag, drastically lowering your plastic waste and dollars spent.
Say you used just one plastic dog waste bag on a daily basis. That’s 356 plastic bags over the course of one year. Now what if you do multiple walks per day or have more than one dog? Multiply that by the thousands of dog owners in your town. The amount of plastic adds up fast!
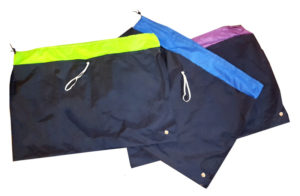
That’s why I designed this bag to help reduce my plastic footprint and become a more environmentally responsible dog owner. These bags were designed to mimic the size and flexibility of an average plastic dog waste bag, therefore, you can use these bags just as you would when normally picking up your doggie’s poo… with a few advantages.
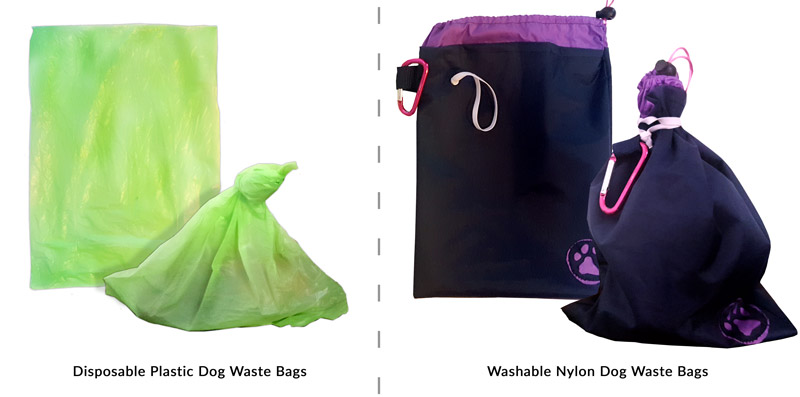
My ideal fabric of choice is nylon – for several reasons; Nylon is tear resistant, thin & flexible (similar to plastic), strong enough to handle heavy weight, and will retain its color when washed with bleach. These nylon bags can hold more volume than your average plastic bag, keeps the odors well-contained, and allows you to seal the top with very little hands-on interaction.
Have basic sewing skills? You can make your own washable & reusable dog waste bag! Follow my tutorial below.
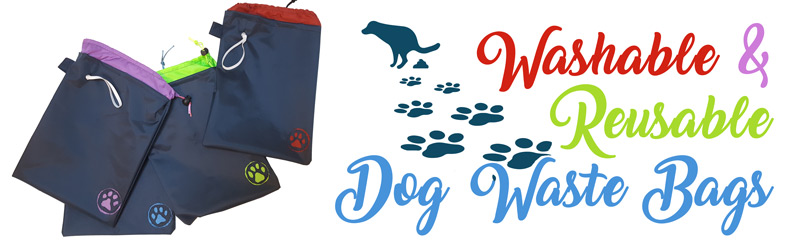
Make Your Own Reusable & Washable Dog Waste Bag
Supplies:
- Sewing machine
- Hand sewing needle & thread
- Scissor
- 1 Yard 40D RipStop Nylon
- 1 Yard 420D Pack Cloth Nylon
- Hammer
- 1 Set of Grommet Eyelets – 6mm or 1/4″ Inside Diameter (with setting tool)
- 1/4″ x 12″ Braided Elastic
- 2mm x 30″ Nylon Satin Rattail Cord
- 1 Round 15 mm x 20 mm Cord Stop
- 1″ x 2.5″ Heavy Webbing Nylon Strap
- 2.5″ Carabiner Clip
Step 1: Cut the Fabric
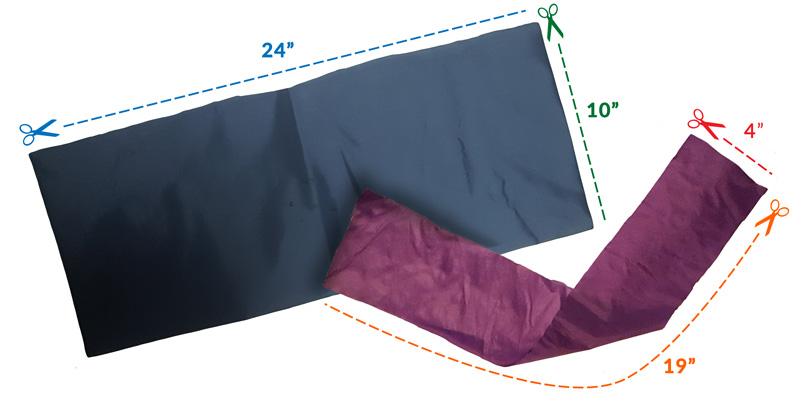
The dark blue fabric will serve as the main part of the bag that can withstand the full weight of the dog waste. It uses a much heavier 420 denier nylon known as Pack Cloth, possessing a urethane backing that gives it a strong water repellent coating. We’ll refer to this piece as the 420D nylon.
- Cut a 4″ x 19″ piece of the 40D nylon (shown in purple)
- Cut a 10″ x 24″ piece of the 420D nylon (shown in dark blue)
Step 2: Create Design with Spare Fabric (optional)

Purely for aesthetic reasons, I used some spare fabric to create a cute design to place in the bottom right hand corner of the bag.
- Cut a circle out of each of the nylon fabrics, making sure one is slightly larger than the other.
- Cut a pattern (such as a paw print) out of the smaller circle, then place the smaller circle on top of the larger circle.
- Fold the 420D nylon in half crosswise so that the right side of the fabric is showing and pin your circles down to the desired location (I chose the bottom right corner). Gently place thefabric in the sewing machine, making sure that you will only be sewing the circle onto the top half of the fabric (and not sewing both sides of the bag together).
- I used the zigzag sewing pattern with a high width & length setting on the sewing machine in order to sew down the edges of both circles at the same time.
Step 3: Insert Eyelet

- Open flat, then fold the 420D Nylon in half crosswise with the wrong side of the fabric showing. Measure two inches from the top and right edge inward and place the eyelet in between the inner right sides of the fabric. Place the washer on top of the fabric matching up with the eyelet.
- Place the setting tool into the washer and slightly hammer it down until the eyelet and washer have become one piece.
- The setting tool should have punched out a hole through the nylon for you without having to cut a hole beforehand.
Step 4: Fasten Elastic Cord

- Tie the two ends of your elastic cord into a double knot, leaving about 3/4″ of loose cord at the end.
- Open flat, then fold the 420D nylon in half crosswise so that the right side is showing. Place the cord, loose end first, through the eyelet and make sure that the knot cannot go through the hole (if it can, you might need to make your knot a bit bigger).
- Flip the fabric over to view the loose elastic cord on the other side. Use a doubled threaded cross stitch or straight stitch up and down on the small bit of loose cord in order to secure it in place. The elastic cord should now be attached to your bag.
Step 5: Sew in Drawstring

- Take the 40D fabric and fold in half lengthwise. Place the rattail cord into the fold, making sure there is excess of at least 3 inches sticking out of both ends of the fabric. You may want to secure the cord temporarily in place with a clip or clothespin.
- Sew down the length of the fabric just to the left of where the cord is. I used a tight, short length straight stitch. Be careful not to sew through the cord itself.
- Still with the rattail ends sticking out, carefully fold your newly sewn fabric in half crosswise.
- Place the two ends of the rattail through the cordstop, making sure the fabric is laying flat and not bunched up. Tie a knot at the end to prevent the cord stop from falling off.
Step 6:Embed Loop for Carabiner
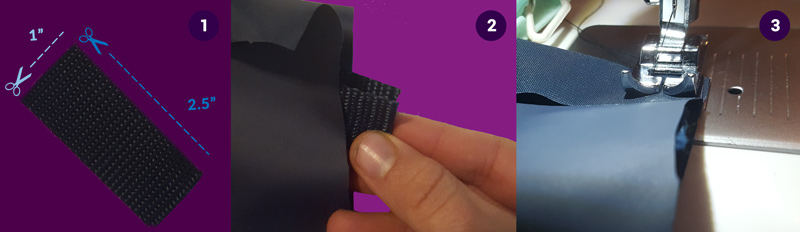
- Take the piece of heavy webbing nylon strap and fold it in half crosswise.
- Open the 420D nylon flat, then fold the 420D nylon in half crosswise so that the wrongside is showing. You should see the eyelet you made in the upper right hand corner. Measure about 2″ from the top on the right side of the 420D fabric or eyeball a straight line from the eyelet to the right edge of the fabric. Stick the strap here, with the open edges facing outwards, in between the two inner sides of the 420D fabric.
- Use a wide zigzag pattern on the sewing machine to go up and down on the edge of the fabric where the strap is in order to hold it in place.
Step 7:Attach Top Fabric
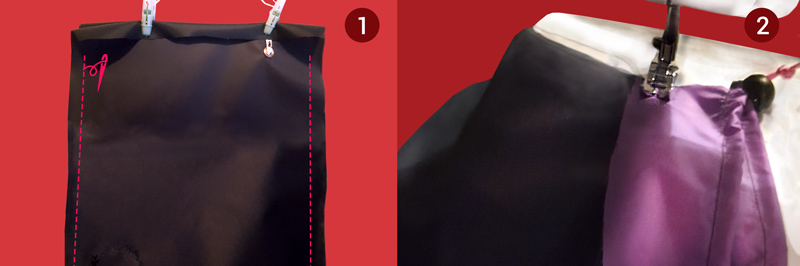
- First you will want to sew together each side’s edges of the 420D fabric to complete the bottom portion of the bag. Make sure to leave 1″ at the top left un-sewn. Fold that 1″ in half downwards to make a lip and temporaily hold in place with clips or clothespins.
- Place the 40D fabric that now has the rattail cord inside on top of the folded lip of the 420D fabric, then sew around the perimeter of the lip. The cord stop should end up on the opposite side of where the eyelet and strap is.
You’re Done!
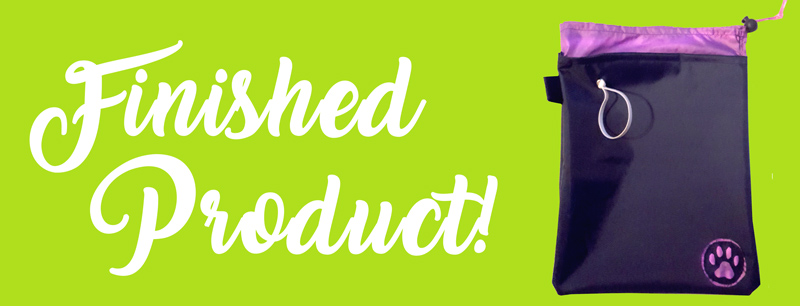
Turn the bag inside out to reveal the finished product!
Stick the carabiner through the loop and you are ready to take your dog out for a walk.
….Or you can keep going and make a few more in order to have a entire roll of bags to carry along with you.
Roll Up Multiple Bags To Carry on Walks
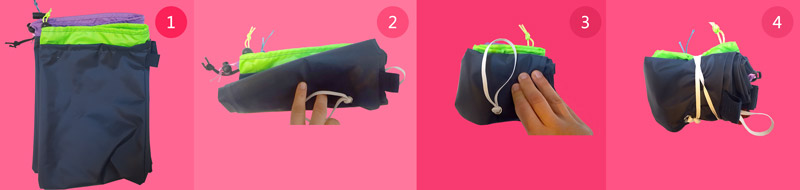
Once you have made about 4 or 5 of these reusable dog waste bags, you can turn them into a compact roll that can be easily brought along on your walks.
- Take your bags and lay them down on top of each other with the eyelet side facing downwards, no carabiners should be in any of them.
- Roll up the bags together from the bottom towards top.
- Fold the rolled up bags in half crosswise from right to left.
- There should be one elastic cord now on top, facing you. Use this cord to wrap all of your bags together.
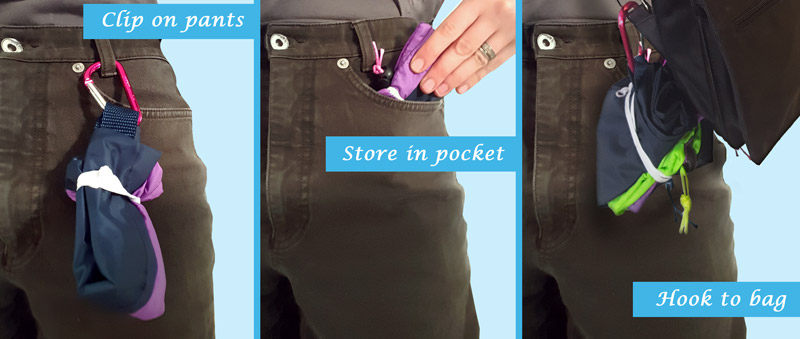
- Once your roll of bags is complete, a looped strap should be sticking out to the right. Place a carabiner though it to either clip to your pants, purse, etc. or simply place the bags in your pocket for easy access.
How to Pick Up Dog Poop
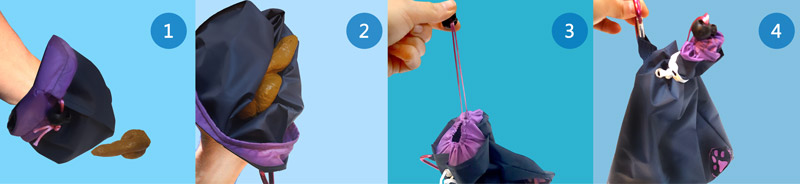
- Put your hand through the bag and wrap over wrist so that the wrong side of the fabric is sticking out.
- Pick up the poop in your hands through the fabric (advantage number one – thicker fabric means you don’t have to feel the poo as much).
- Use your other hand to reach for the rattail cord that is near your wrist and pull it up and out, causing the bag to close up around the poop (advantage number two – closing the bag up by the cord instead of having to touch the tops of the bag is way less gross).
- Push the cord stop down to close up the bag as much as possible. Often times, especially with bigger poops, the bag will not be able to be closed all the way. This is where the elastic cord comes in; Grab the elastic and wrap it around the top to seal the bag shut so that no odor can escape. Use your handy dandy carabiner to continue holding the bag (advantage number 3 – carry your bag by the carabiner, furthering you away from the poopies contained within the bag).
Ways to Carry Dirty Dog Waste Bags
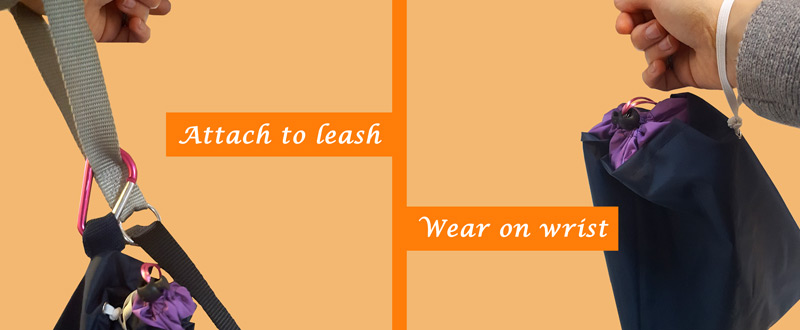
Use the carabiner to clip your dirty bag to a handbag or your dog’s leash. If your dog’s poopies are small enough, you’ll be able to close the bag with just the drawstring and you can use the elastic cord to wear around your wrist.
How to Dispose and Clean Reusable Dog Waste Bags
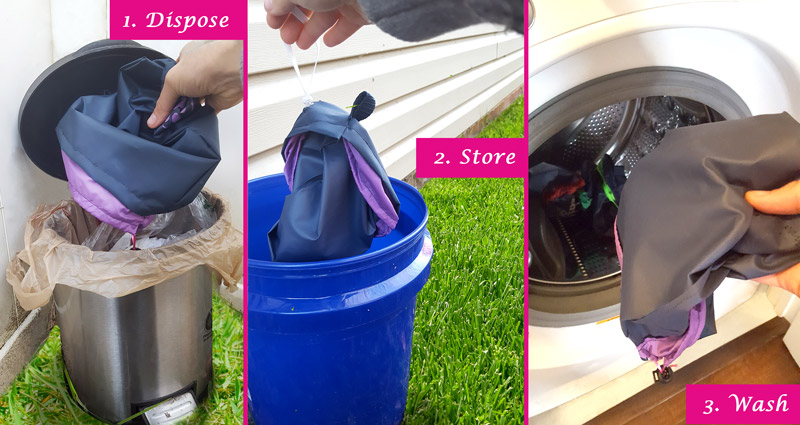
This is probably the most important question that you will have. You are saving a plastic bag but now what do I do with my dog’s poop?
More than likely you will have to bring it home with you when you are done on your walk. You may be able to flush the dog waste down the toilet if your county’s sewage treatment plant allows you to (you may need to call and ask). If not, throw it away in an outdoor garbage can. You should already have one in your backyard that holds the rest of your dog’s waste that you scoop on a regular basis.
As for the empty dirty bags you are left with after dumping the poo, turn them inside out and store in an outdoor container until you are ready to wash them all together.
When you are ready, throw the bags (inside out) into the washing machine, separate from the rest of your clothes. Add detergent and bleach, then set the load to heavy soil, medium spin. Hang the wet bags outside for a few hours to dry and they’re ready to go again!
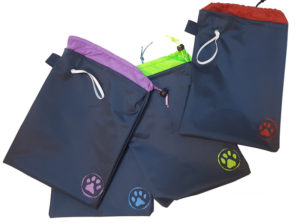
Priced at $10.00 each or $45.00 for a 5-bag roll (+ free shipping).
Learn how Pet Poo Skiddoo uses reusable bags when scooping your yard!
 “We have always strived to reduce the waste we create in our business even though collecting waste is our business!”
 Now Using Reusable Bags When Scooping Dog Waste
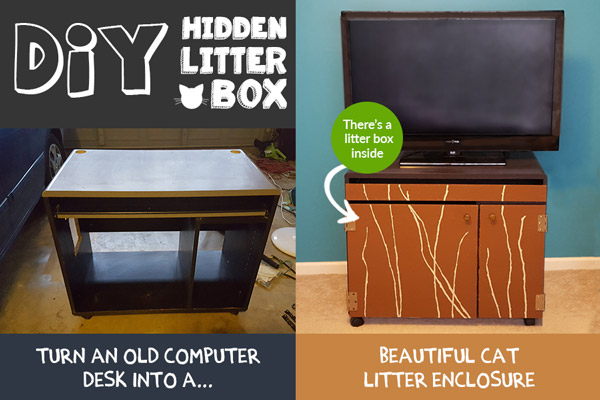 DIY Cat Litter Enclosure (from a computer desk)
 Poop scooping service can clean the air you breathe